


Looking to boost your app's visibility and acquire more users? Our 2025 ASO Report is your ultimate guide to navigating the evolving app store landscape. Packed with data-driven insights, keyword trends, and top-ranking app strategies, this report will equip you with the knowledge to optimize your app's presence and achieve organic growth.
App Store product page optimization is one of the most effective ways to increase visibility and improve conversion on the App Store. When you optimize your product page, you help users understand your value faster, reduce friction, and increase the likelihood that they install your app.
In this blog post, we will explain what product page optimization is, how product page A/B testing works in the App Store, and which strategies help you improve performance with reliable, data-driven methods.
What is product page optimization?
App Store product page optimization is the process of improving your App Store product page to increase both search visibility and conversion rate. It includes refining your metadata, updating store assets, and validating those updates through experiments.
Optimizing your app store listing can include:
- Improving search relevance with keyword optimization
- Increasing conversion through stronger screenshots, icons, and videos
- Testing variations with product page optimization
Because competition increases every year, product page optimization gives you a structured way to understand what works and what does not before deploying large changes.
Product page optimization vs. custom product pages
It’s essential to understand the differences between product pages and custom product pages;
| Category | Product page optimization | Custom product pages |
| Purpose | A/B test your default product page | Create audience-specific product pages |
| Traffic Source | A portion of App Store search & browse | Apple Search Ads, deep links, external campaigns |
| Variations | 1 (can be tested with 3 variations) | Up to 70 pages per app |
| Editable Assets | Icon, screenshots, app previews | Icon, screenshots, app previews (per audience) |
| Targeting | No targeting, same variant for all users | Full targeting by keyword, ad group, channel, segment |
| Use Cases | Improve conversion for all users | Match page to intent (e.g. “workout plans”) |
| Impact | Affects default page conversion | Improves paid CVR and campaign efficiency |
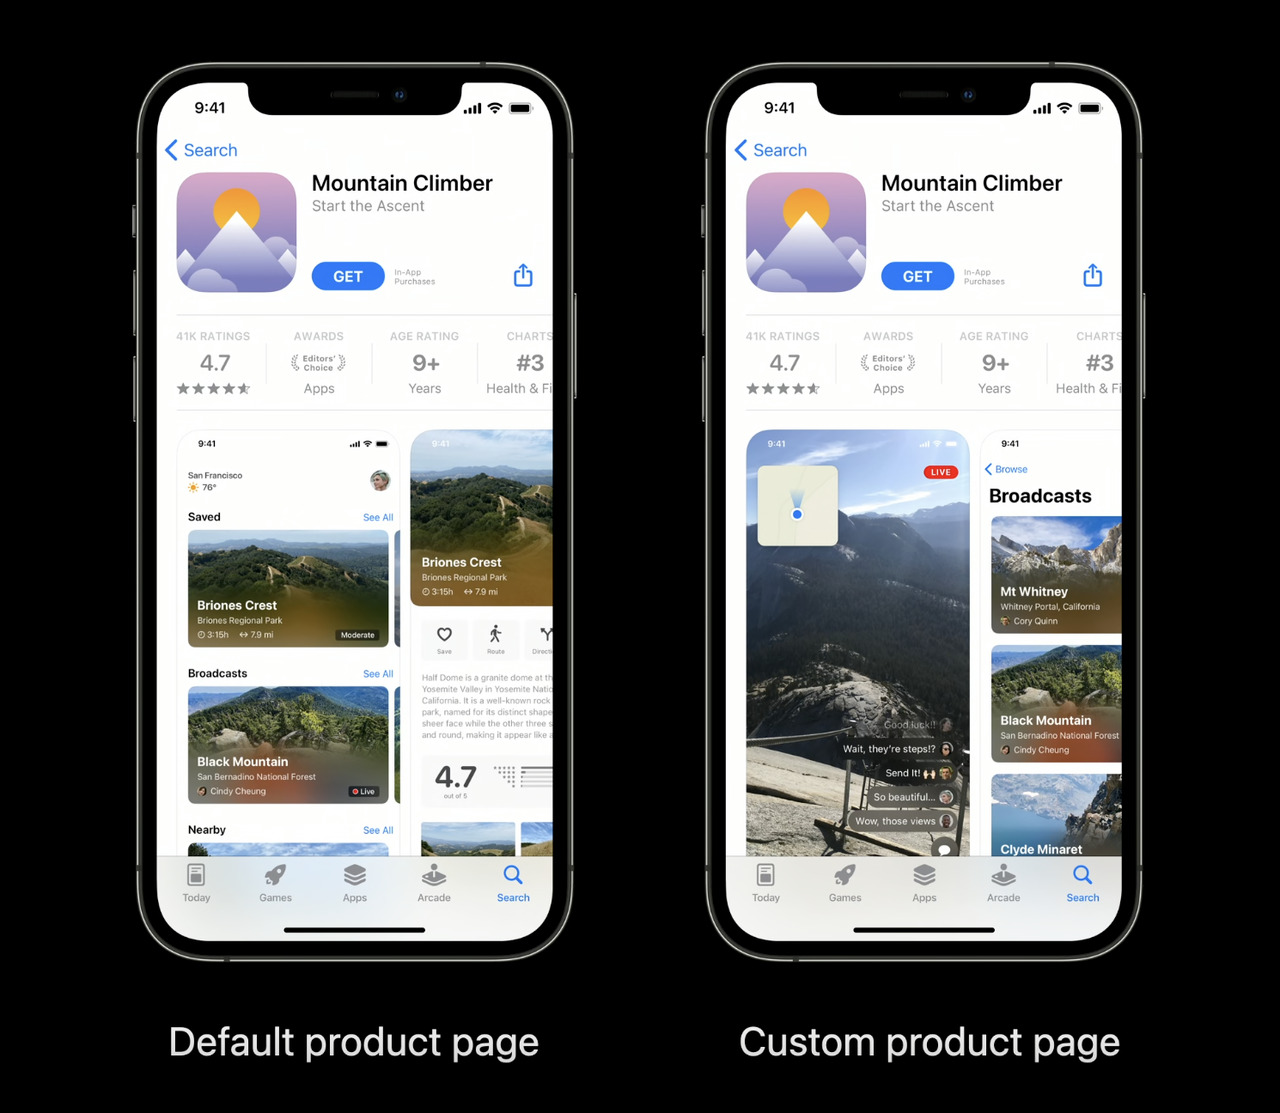
MobileAction’s CPP Intelligence helps you analyze how each custom product page performs, while ASO Intelligence supports your default product page optimization.
Why is Apple product page optimization important for ASO?
Product page optimization directly influences two core ASO outcomes:
- Search visibility: Updating titles, subtitles, and keywords improves how your app ranks across high-intent queries.
- Conversion rate: Better screenshots, clearer messaging, and more relevant visuals help users understand your app faster. Apple measures this as product page conversion rate.
Better app conversion rate leads to:
- Higher install velocity
- Improved ranking stability
- Lower advertising costs
- More efficient Apple Ads campaigns
Product page optimization and ASO are tightly connected because visibility brings traffic, and conversion ensures that traffic turns into installs.
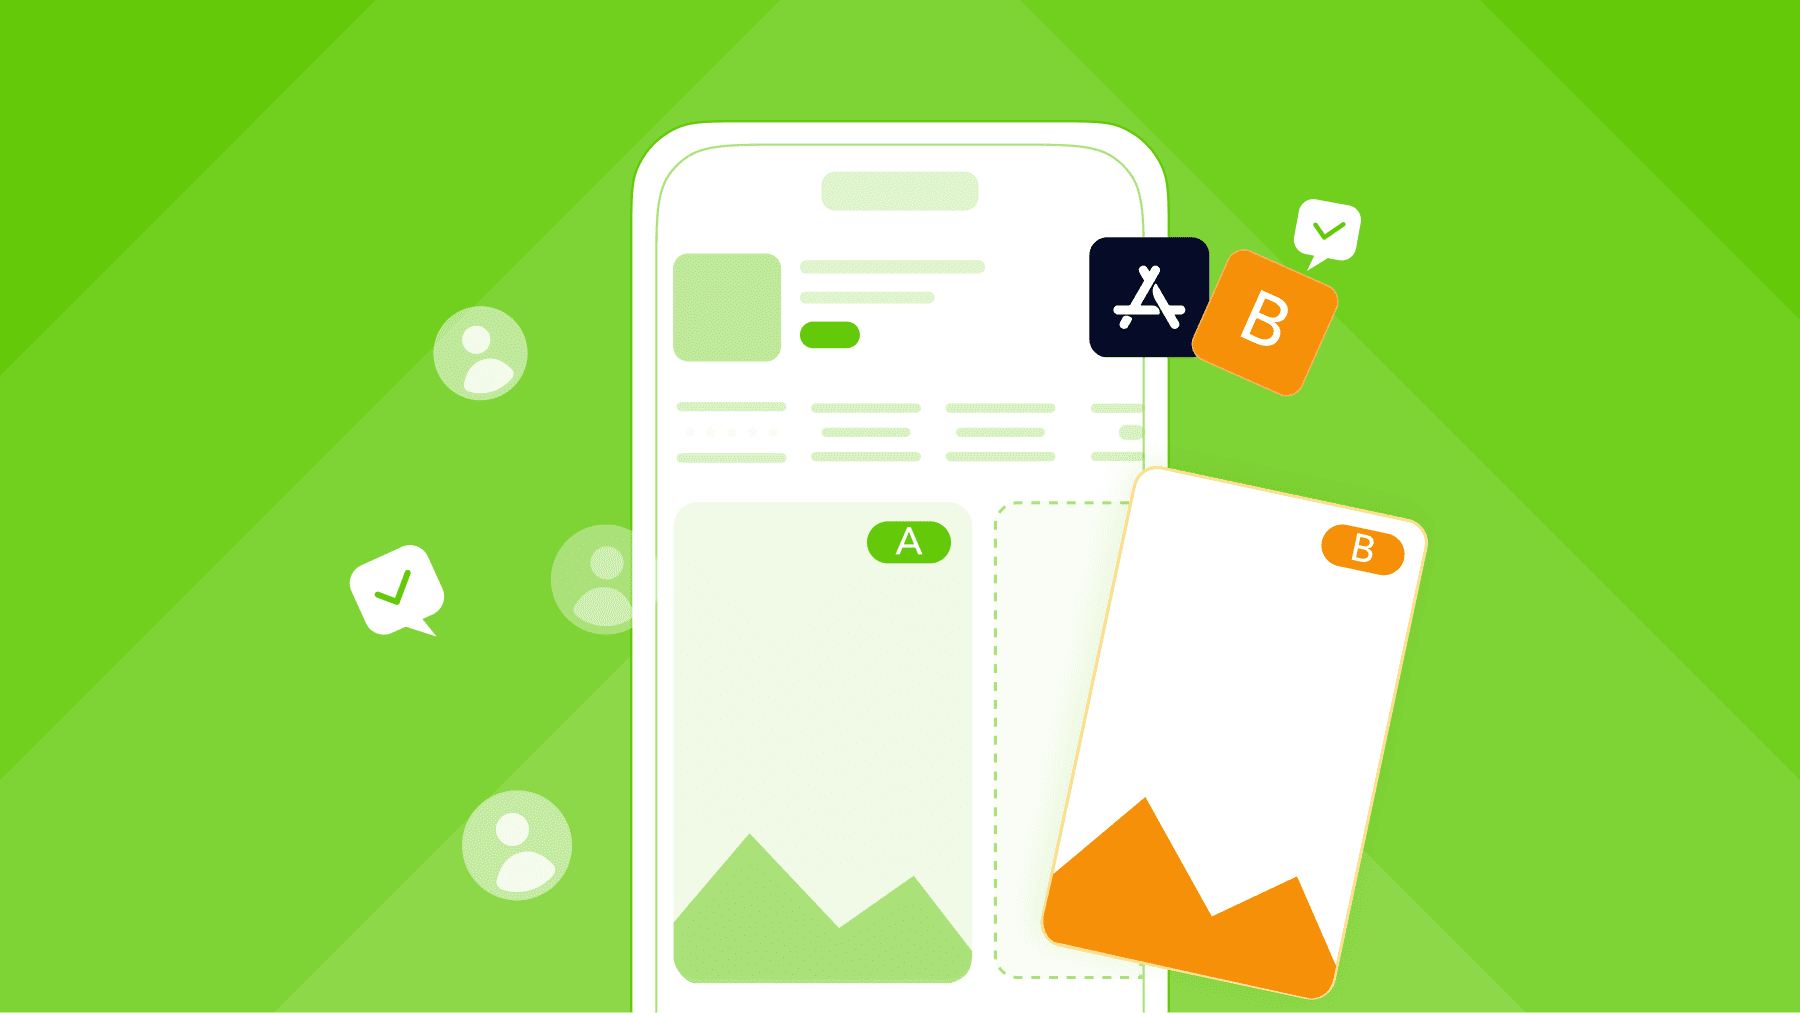
Which assets can you test with App Store product page optimization?
With product page optimization, Apple limits what you can test to a specific set of visual assets on your default iOS or iPadOS product page. Every treatment starts as a copy of your existing product page, and you can then modify only these elements: app icon, screenshots, and app previews.
Below is what you can and cannot change.
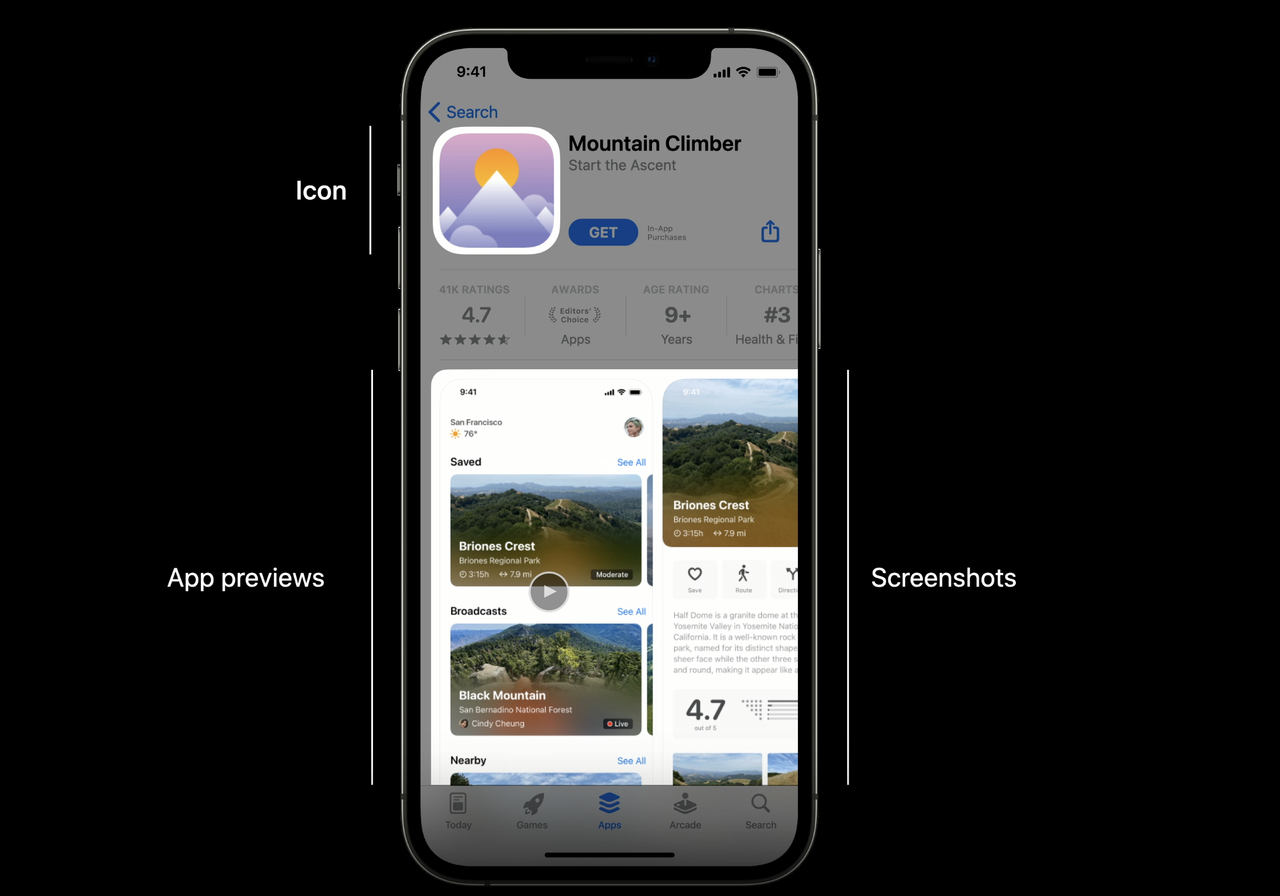
1. App icon
You can test different app icons as part of a product page optimization test, as long as the icons are already included in the app binary that is live on the App Store.
![]()
Key points from Apple’s documentation:
- The App Icon tab appears in the treatment editor only if your current live version includes multiple icons in its asset catalog.
- Icons must be configured as alternate icons in your asset catalog and built with an appropriate SDK (Xcode 13 or later).
- When someone downloads your app from a treatment that shows a test icon, that icon displays on their device.
When you apply a winning treatment to your live product page, only the screenshots and app previews are applied automatically. To fully roll out a winning icon, you still need to set that icon as the default in a new app version.
2. Screenshots
You can test alternative screenshot sets across different device sizes (iPhone, iPad). These are the same screenshots that appear in search results and on the product page.
According to Apple’s product page guidelines:
- You can display up to 10 screenshots on your App Store product page.
- In product page optimization test, you can upload or reorder screenshots per device size. If you don’t change screenshots for a specific device size, Apple will use the ones from your original product page for that size.
This means product page optimization is ideal for testing:
- New visual concepts (feature-focused vs. lifestyle-focused)
- Different ordering (e.g., paywall vs. feature first)
- Localization-specific designs for certain markets
3. App previews (app preview videos)
You can also test different app previews as part of a product page optimization test. Apple explicitly includes app previews as one of the core elements you can compare;
From the official docs:
- App previews are short videos (up to 30 seconds) demonstrating your app’s UI and key functionality.
- You can show up to three app previews per product page and localize them for all App Store languages you support.
- In product page optimization, you can replace previews per device type; if you don’t provide a new one for a specific device, Apple falls back to the original preview.
Testing app previews lets you compare different narrative angles, feature sequences, or pacing to see which version drives stronger engagement and conversion.
What you can’t test with product page optimization
Based on Apple’s own description, product page optimization focuses strictly on visual elements: app icons, screenshots, and app preview videos. Text-based metadata like app name, subtitle, description, and keywords are not part of product page optimization, and must be updated through standard metadata submissions instead.
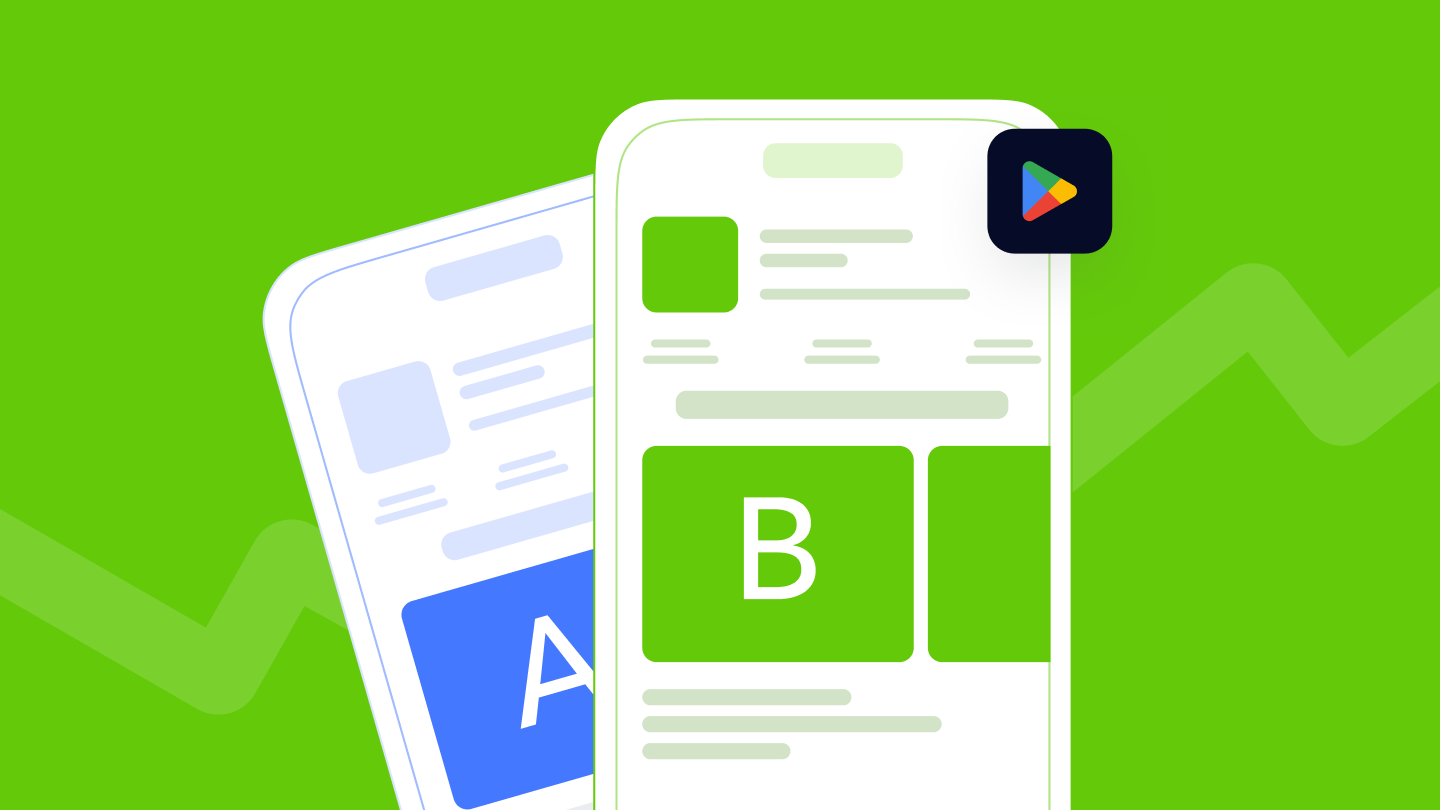
How to run an A/B test in App Store Connect
Creating your first product page optimization test in App Store Connect follows a clear sequence: you confirm eligibility, set up the test shell, and then configure your treatments (variants).
1. Check your eligibility and app status
Before you start, make sure two conditions are met:
- Role: Your App Store Connect role must be Account Holder, Admin, App Manager, or Marketing.
- App status: Your iOS or iPadOS app must be Pre-Order Ready for Distribution or Ready for Distribution, and live on the App Store.
Product page optimization:
- Works only on the default product page (not custom product pages).
- Is not available for Apple Watch or iMessage
2. Open the product page optimization screen
- Sign in to App Store Connect.
- Go to Apps, then select the app you want to test.
- In the left sidebar, click product page optimization.
- If this is your first test, click Create Test. If you’ve created tests before, click the add (+) button next to product page optimization.
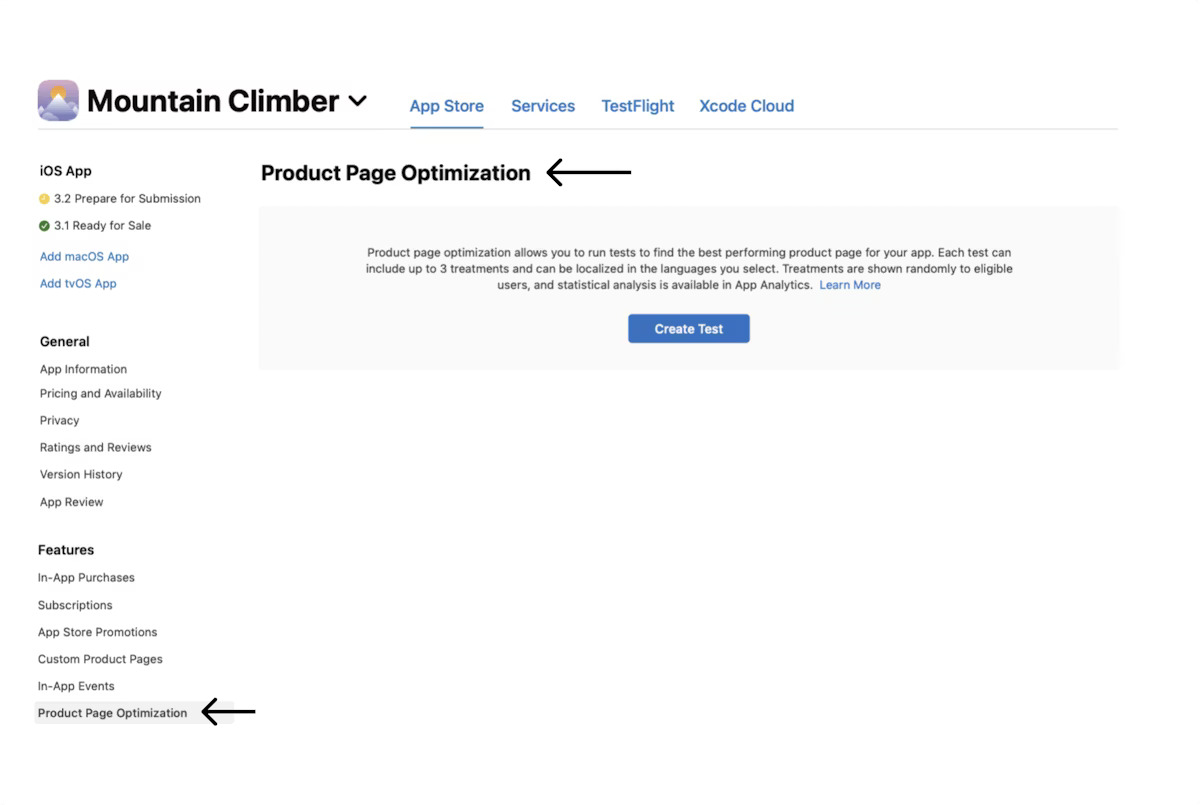
This creates the starting point (test shell) where you define what you want to test.
3. Define your test parameters
Apple’s “Create a test” flow guides you through a set of fields.
a) Reference name
Enter a reference name that makes the test easy to recognize later in App Analytics (for example: “Q3 Icon A/B – Blue vs Green”). This name is only for your internal tracking in App Store Connect and App Analytics.
b) Number of treatments
Choose how many treatments (variants) you want to compare against your original product page. You can create up to 3 treatments (A, B, C) in a single test.
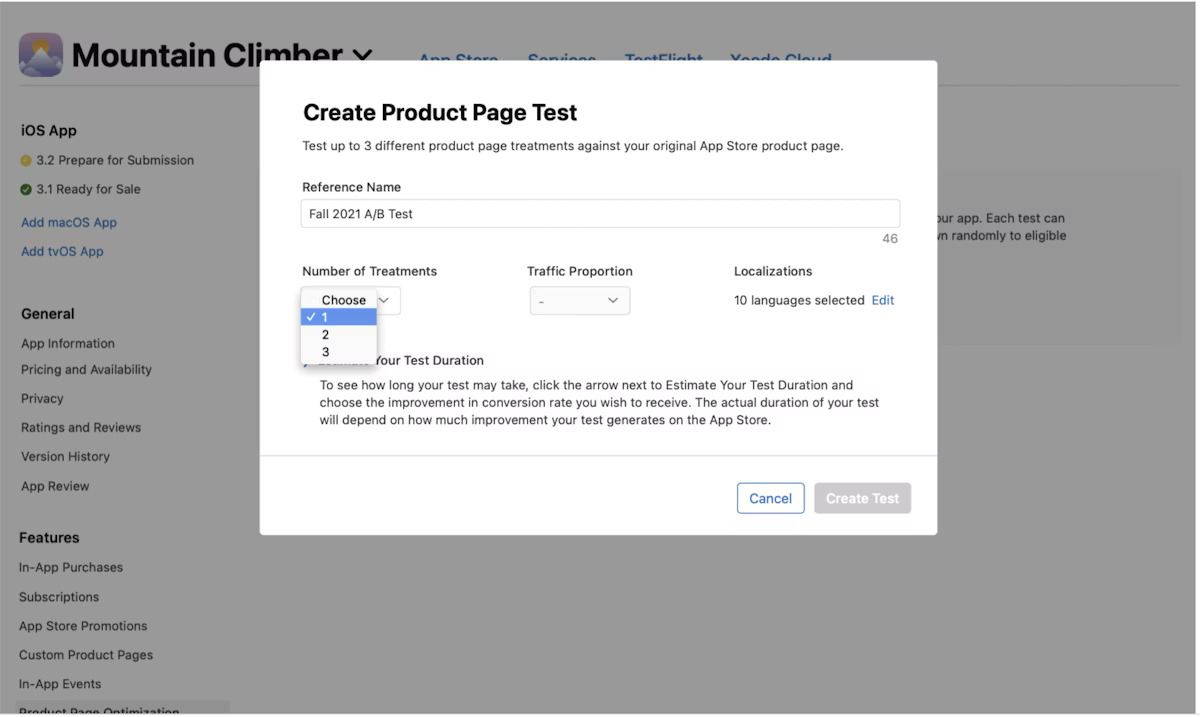
Start with one or two treatments if this is your first product page optimization. More treatments require more traffic to reach results.
c) Traffic proportion
Select the traffic proportion, the percentage of users who will see a treatment instead of the original page.
Apple’s rule:
- If you set 30% traffic and have 3 treatments, each treatment gets 10% of total traffic.
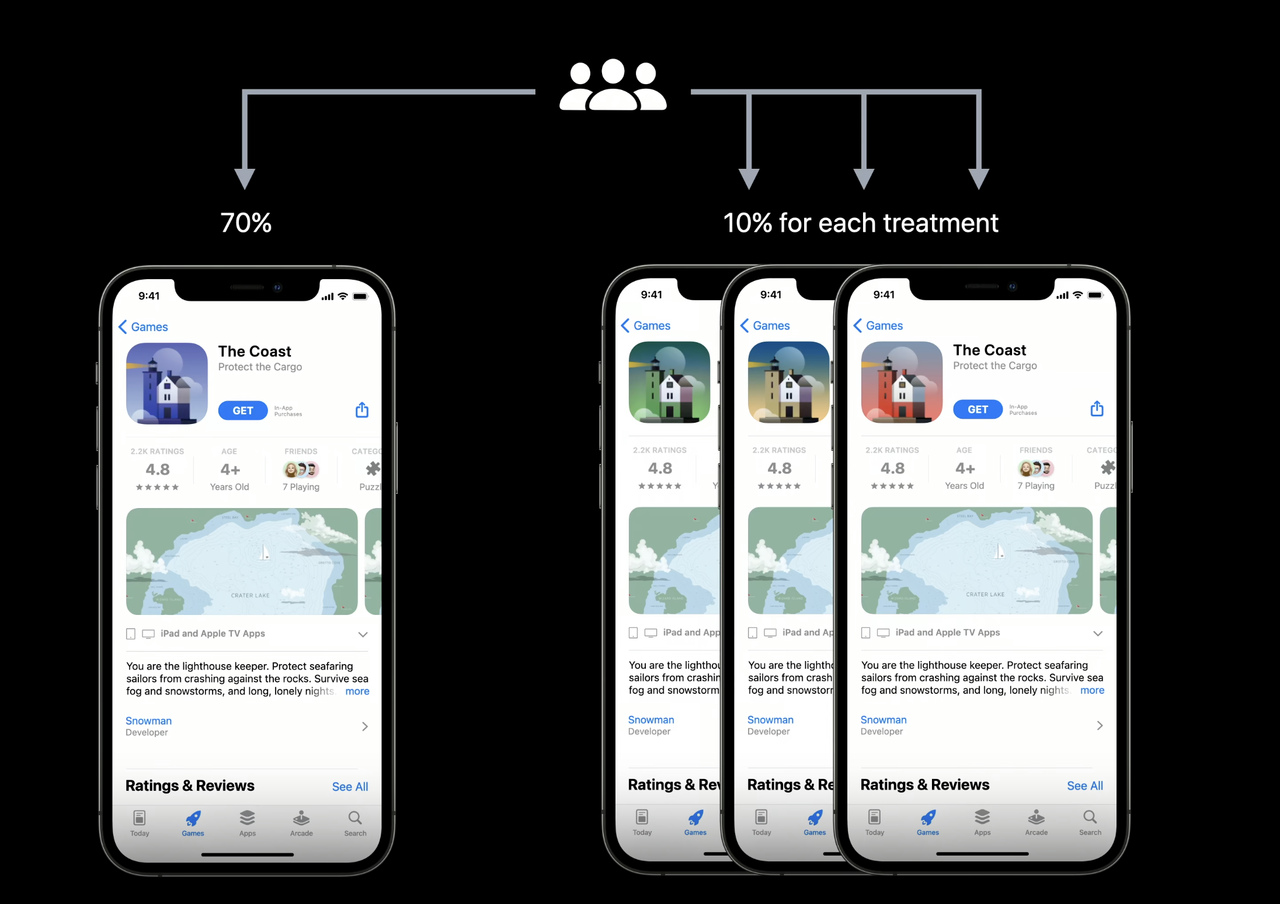
Users are assigned randomly, and a user that sees a treatment will keep seeing that same treatment during the test.
d) Localizations
Choose which localizations to include:
- By default, all localizations supported by your app are selected.
- If a user’s localization is excluded, they won’t be part of the test.
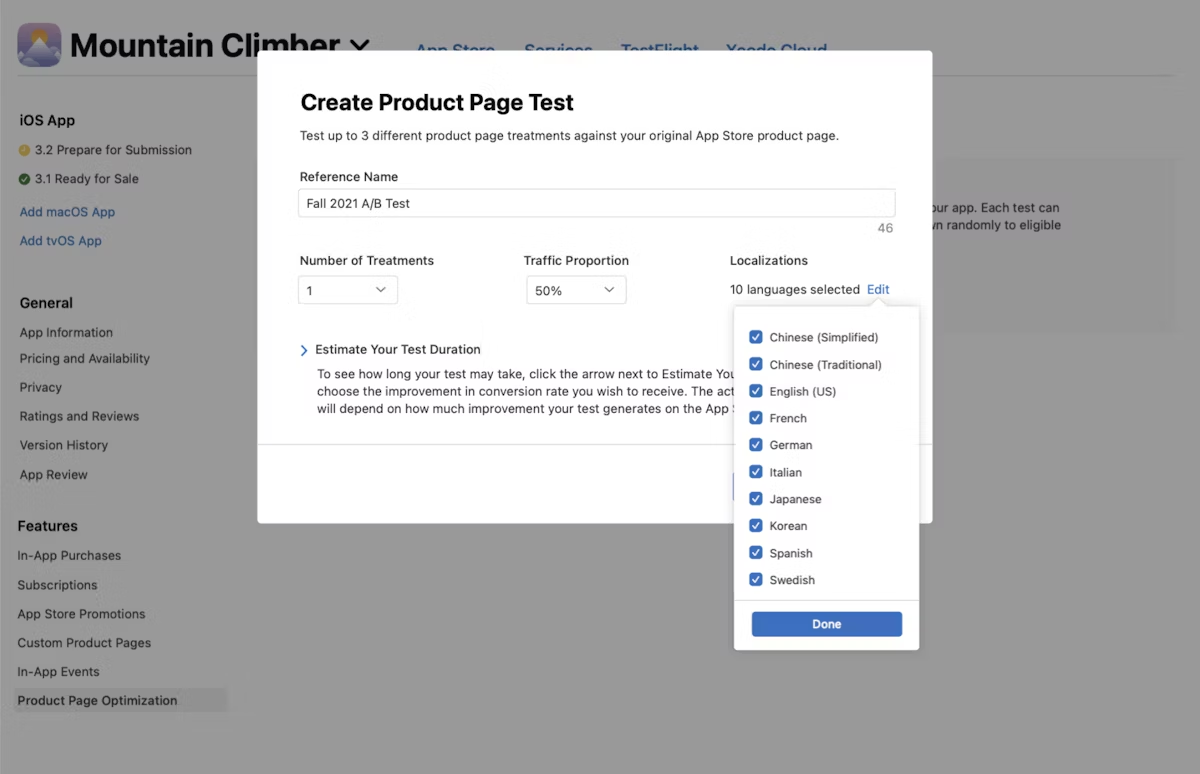
This lets you run tests only in specific languages or markets when needed.
e) Optional: Estimate your test duration
Apple lets you estimate the expected test duration.
- Open Estimate Your Test Duration.
- Select your desired conversion improvement (for example, +5%).
- Apple uses your past impressions and downloads to show an estimated duration.
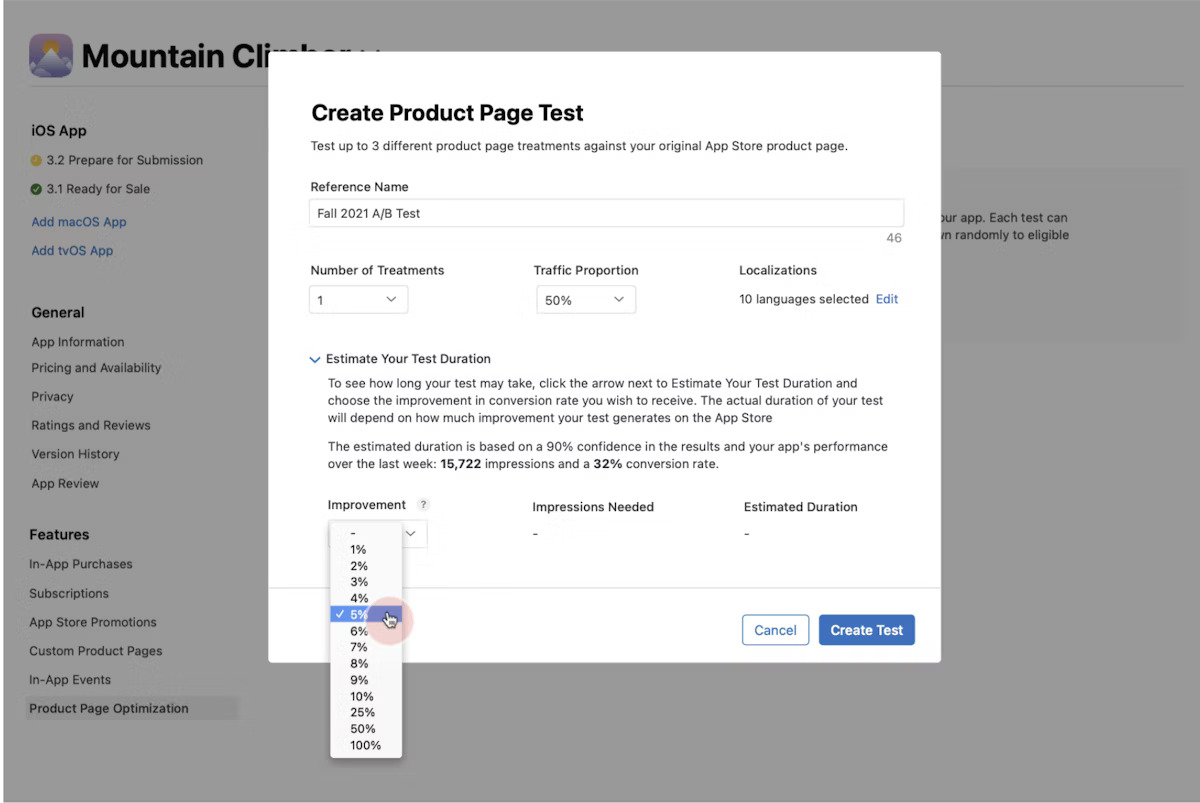
This estimate:
- This is only for planning. It does not affect the actual test, which can run for up to 90 days.
f) Create the test
Click Create Test to finalize the setup. Your treatments are now created as copies of your existing product page.
4. Configure your treatments (variants)
After you create the test:
- Each treatment is initially a copy of your existing product page.
- You can then change the app icon, screenshots, and previews for each treatment.
a) Rename treatments
Treatments are named Treatment A, B, C by default:
- Next to each treatment, click Edit Name.
- Enter a clearer internal name (for example “Icon – Dark Background”).
These names only appear in App Store Connect and App Analytics.
b) Configure app icons (optional)
You can test different app icons only if the version of your app that is already live on the App Store includes more than one icon. These alternate icons must already be part of the app build you uploaded to App Store Connect.
To update the icon in a treatment:
- Open the App Icon tab.
- Click Change.
- Select one of the alternate icons included in your current app build.
Apple’s requirements:
- Alternate icons must be added through an asset catalog.
- Each icon must be 1024×1024 px.
- If a user installs your app from a treatment using a test icon, that icon will appear on their device.
- If you’re designing icons for 2025 and beyond, Apple’s new Liquid Glass icons help icons stay clear, layered, and consistent across both light and dark appearances.
c) Configure screenshots and app previews
For each device type:
- Click the relevant device tabs (e.g., iPhone sizes, iPad).
- Add or update screenshots and app previews for each treatment.
If you do not replace the screenshots for a specific device size, the treatment will use your original screenshots.
5. Ensure metadata approval and start testing
Before your test can run:
- All new metadata used in treatments (new icons, screenshots, previews) must be approved.
- You can submit this metadata for review without submitting a new app version.
If you are only:
- Reordering existing screenshots or previews, or
- Using a different icon already approved in the current binary,
then your metadata is already approved and you do not need to resubmit.
Once metadata is approved and treatments are configured, you can start the test. Apple will then:
- Randomly show your treatments to eligible users (on iOS 15 / iPadOS 15 or later).
- Report performance in App Analytics, including conversion metrics specific to product page optimization.

Product page A/B testing strategies in App Store
When you run product page optimization tests in App Store Connect, the goal is to understand which version of your page leads to higher conversion. Below are simple, practical strategies that help you get reliable results from your product page A/B testing and use your traffic efficiently.
1. Start with one clear goal for each test
Apple’s documentation treats product page optimization as a way to answer a specific question: which version of your product page leads to more downloads after a view (conversion rate)?
For each test, decide on one main goal, for example:
- Increase product page conversion optimization for your main market
- Improve performance on your default iOS product page before a big release
- Validate a new visual direction (new icon or screenshot style)
Keeping a single goal makes it easier to interpret the results in App Analytics.
2. Test a small number of focused treatments
When you create a product page optimization test, Apple lets you set up to three treatments. Apple clearly notes that the more treatments you add, the longer the test may take to reach a conclusive result.
For most apps, a good strategy is:
- Start with 1–2 treatments (A/B or A/B/C)
- Change only what you want to learn about (for example, icon only, or first screenshot only)
This makes your ASO tests easier to understand and helps the test finish within Apple’s 90-day limit.
3. Choose a traffic split that matches your risk level
In App Store Connect, you choose a traffic proportion for your test. This defines what percentage of users will see test treatments instead of the original product page. If you set 30% with three treatments, each treatment gets 10% of total traffic.
Simple guidance:
- Use higher traffic (e.g., 50%) if you want faster results and you’re comfortable with more users seeing experimental assets.
- Use lower traffic (e.g., 20–30%) if you prefer to keep most users on your proven product page while still running product page A/B testing app store experiments.
Remember: once a user is assigned to a treatment, they will continue seeing that version during the test.
4. Prioritize high-impact elements: icon, first screenshots, previews
According to Apple, product page optimization tests focus on three asset types: app icons, screenshots, and app previews.
Practical strategies:
- Icon tests: Good for big visual changes, rebrands, or when you adopt new styles recommended by Apple (for example, modern guidelines like Liquid Glass for apple product page optimization).
- First 1–3 screenshots: These are the most visible in search results and on the product page, so they are strong candidates for product page conversion optimization.
- App previews: Use tests to compare different flows or feature highlights in your 30-second videos.
Start with the assets that most users see first. This usually delivers the biggest impact on iOS product page optimization.
5. Use localization-specific tests for key markets
Apple lets you choose which localizations are included in each product page optimization test. All supported languages are selected by default, but you can limit the test to specific markets.
Strategy:
- Run separate tests for your highest-traffic regions (for example, US English, Japanese, German).
- Localize screenshots and previews to match language and cultural expectations, then use product page optimization to verify which localized product page version performs best.
This approach helps you optimize product pages for search visibility and conversion in the markets that matter most, using controlled app store product page optimization rather than global changes.
6. Respect the test duration and confidence signals
Apple states that:
- Tests can run for up to 90 days or until you stop them.
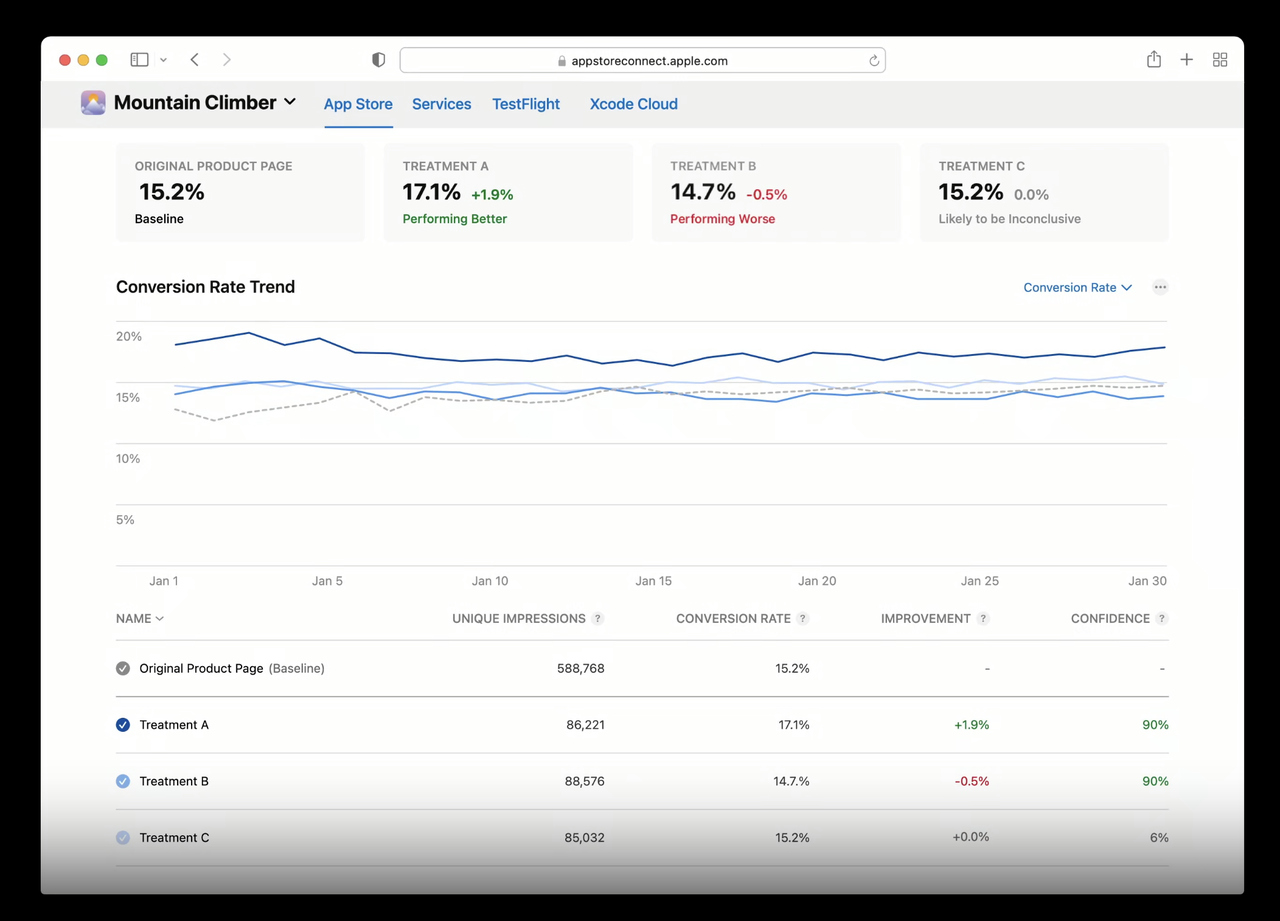
- App Analytics uses conversion rate and confidence to mark a treatment as Performing Better or Performing Worse than your chosen baseline once enough data is collected (typically at 90% confidence).
Good practice for product page optimization Apple:
- Let the test run until Apple shows a clear result (Better/Worse) or flags that it may be inconclusive.
- Avoid stopping tests too early based on small data samples.
- If Apple warns that the test may not reach significance with current traffic, consider changing future tests (for example, fewer treatments or more traffic).
When a treatment clearly outperforms your baseline, Apple lets you apply that version so it becomes your main product page for all users.
Practical loop for ongoing app store listing optimization:
- Run a product page optimization test focused on one change (icon, screenshots, or previews).
- Wait for a clear winner in App Analytics.
- Apply the best-performing variant to your default page.
- Plan the next test (for example, new screenshot order, different preview, or next market).
Over time, this creates a continuous app store connect product page optimization workflow, where each test builds on real user behavior and measured conversion impact.
Challenges of product page optimization A/B testing
Running a test for product page optimization in the App Store sounds great, but there are several real-world limitations and challenges you should plan for. Knowing these upfront will help you manage expectations and design smarter tests.
1. Requirement for sufficient traffic and data
The performance of your test is only useful if enough users see the treatments and take action. According to Apple, you’ll get results only when there are enough impressions and downloads to reach high confidence levels.
If your app has low traffic, your test may run for a long time without delivering a clear winning variant.
2. Limit of 90 days and only one test at a time
Apple limits a product page optimization test to 90 days, or until you stop it manually.
You can only have one active test for the default product page at a time. That means you must pick your hypothesis carefully and cannot run multiple concurrent experiments on that page.
3. Only certain assets can be tested
You cannot test everything on your product page. Apple allows you to test only app icons, screenshots, and app previews.
Metadata like the app name, subtitle, description, or keywords cannot be changed within a product page optimization test. If those are weak, they still limit your overall conversion.
4. Changes during the test can disrupt results
If you submit a new version of your app that includes changes to metadata or assets being tested, it may affect your test’s validity. Apple notes that releasing a new app version while a test is running may impact results.
That means you must plan your updates carefully, ideally scheduling the test when you do not plan major version changes.
5. Localization and segmentation slow down results
If you include many localizations (languages/countries) in your test, the data for each market will be smaller. Apple warns that choosing many localizations can increase the time required to reach meaningful results.
If you test across too many markets, you may dilute your data. It’s often better to test first in your top market or top few markets.
6. Validating treatment impact beyond installs
The main metric in product page optimization is conversion rate from product page view to install (or pre-order). But winning a test doesn’t guarantee better long-term outcomes (like retention or revenue). Apple’s results dashboard focuses on conversion rate and confidence.
You’ll need to monitor other metrics post-treatment to make sure the change doesn’t harm retention or quality of users.
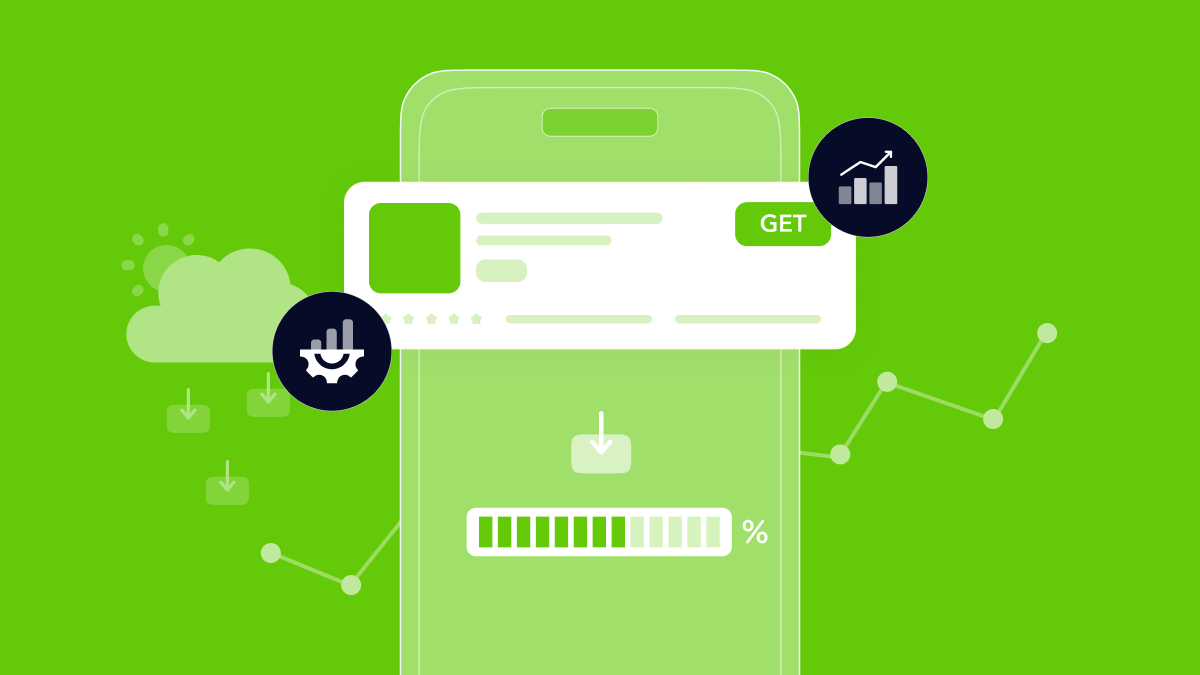
How to use MobileAction for product page optimization
When you run product page optimization in App Store Connect, you need data to decide what to test, where to test it, and whether the change actually worked. MobileAction provides exactly the insights you need at each step.
1. Metadata Optimizer – Improve search visibility before testing
Before touching screenshots or icons, use Metadata Optimizer to refine your title, subtitle, and keywords. This ensures your default product page is already aligned with the right search terms, so your product page optimization tests run on a strong foundation.
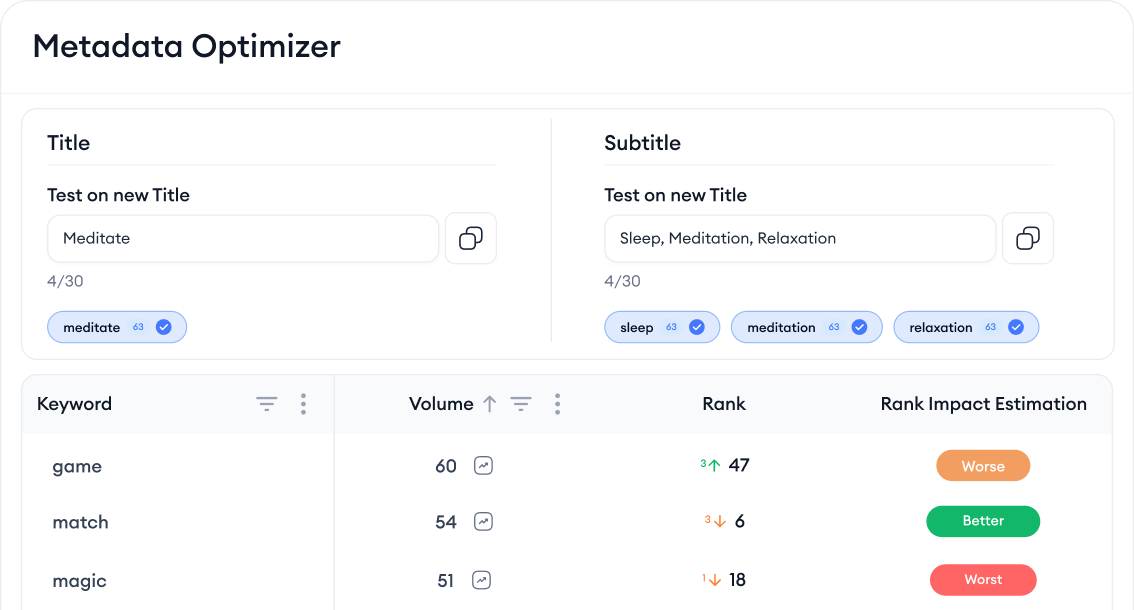
Use it for:
- Choosing the best-performing keyword combinations
- Increasing relevance before running your next test
- Ensuring your page is optimized for search visibility
2. Keyword Inspector – Identify high-intent keywords to shape your creatives
Keyword Inspector shows search volume, difficulty, competition, and ranking history. Knowing which queries drive your traffic helps you design screenshot sets that speak to actual user intent.
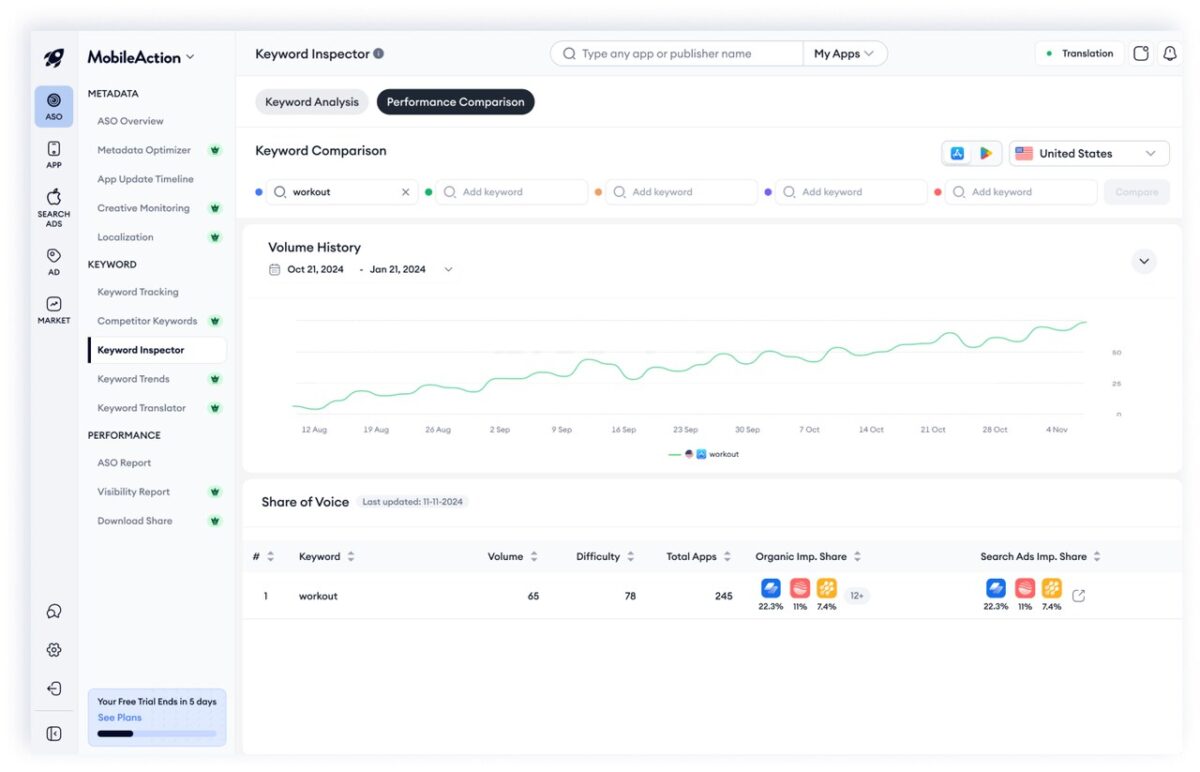
Use it for:
- Prioritizing visuals for the search terms that matter
- Finding content gaps against competitors
- Aligning your first screenshots with user intent
3. Creative Monitoring – Track competitor trends and test better visuals
Creative Monitoring shows how competitors update their screenshots, icons, and preview videos across markets. This makes it easier to decide exactly which assets to test with Apple’s product page optimization.
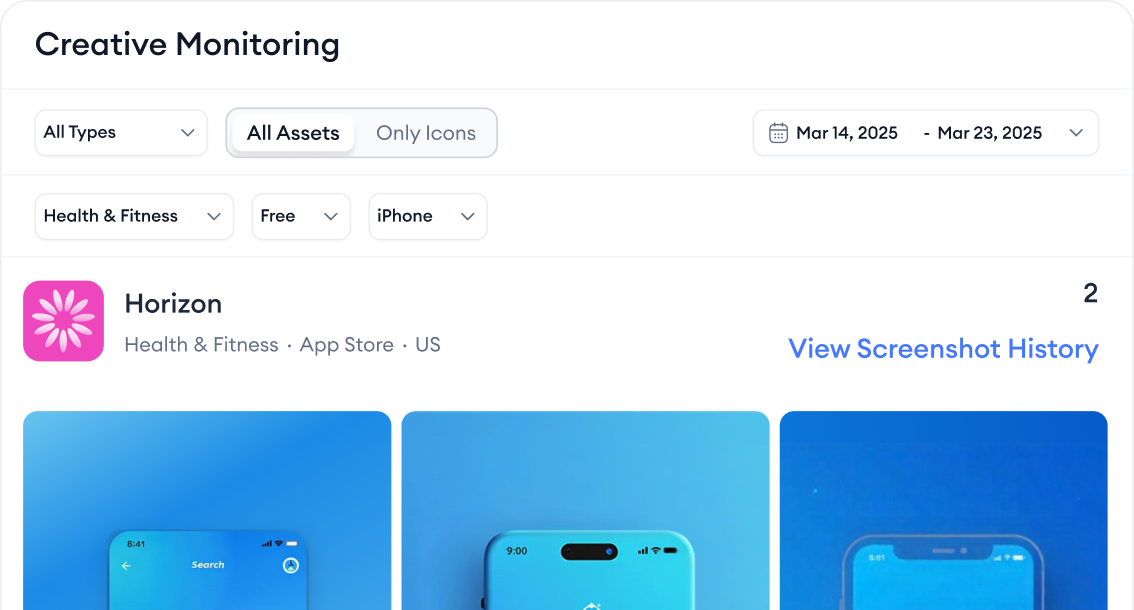
Use it for:
- Spotting winning visual trends in your category
- Planning your icon or screenshot hypotheses
- Ensuring your treatments stay competitive in 2025
4. Conversion Funnel View – Measure the impact of every test
After you apply a winning treatment, Conversion Funnel View helps you check whether your new product page improved:
- Impressions
- Product page views
- Conversion rate
This closes the loop and confirms whether your new visuals are actually driving more installs.

Conclusion
Product page optimization is one of the most reliable ways to strengthen search visibility and improve conversion on the App Store. By applying structured product page A/B testing, validating ideas through real data you can reduce guesswork and build pages that convert consistently across markets.
A strong product page makes every marketing channel more efficient, organic, paid, and seasonal. Product teams, growth teams, and marketing teams can all rely on product page optimization as a measurable and scalable method for App Store success.
Frequently asked questions
What is the difference between store listing experiments and product page optimization?
Store listing experiments on Google Play and product page optimization on the App Store both let you run A/B tests, but they work very differently. Google Play allows you to test almost every part of your store listing, including the app name, descriptions, icon, screenshots, feature graphic, and promo video. Apple’s product page optimization is more limited: you can only test visual assets such as the app icon, screenshots, and app previews. All text-based metadata (name, subtitle, description, keywords) cannot be tested in product page optimization.
Another major difference is how these tests apply to audiences. Google Play lets you run experiments on your default store listing or country-specific listings, giving you more control over targeting. Apple’s product page optimization only works on the default product page, and only one test can run at a time. If you want to test concepts for specific audiences on iOS, you need to use custom product pages instead, these are not part of product page optimization.
Finally, both platforms handle results differently. Google Play reports impact on conversion and retained installers, giving you insights into both initial installs and early user quality. Apple focuses strictly on conversion after a product page view and uses confidence levels to label a variant as “Better,” “Worse,” or “No Clear Result.” Tests on iOS also have a strict 90-day limit.
How to measure the results of product page optimization?
First, in App Analytics (inside App Store Connect), navigate to Acquisition → Product Pages, then select your test. Apple shows you the conversion rate for each variant (the estimated percentage of users who installed after viewing the page), the estimated conversion lift versus your baseline, and a confidence level that indicates how reliable the result is.
Second, you should understand when a result is meaningful. Apple states that once a test gathers enough impressions and hits about 90% confidence, a treatment may be flagged as Performing Better or Performing Worse compared to your baseline. If the data is insufficient, the result may show No Clear Result.
Third, only apply a winning treatment when the data is strong. Once one treatment is clearly better with high confidence, you can apply it to your product page for all users. Make sure the test has run long enough and that you’ve confirmed the winner using the dashboard’s metrics (conversion lift, confidence, impressions).
Content Marketing Specialist